


Have you always wanted to build a modern web application that is different from a static website? Well, in this article, you will learn how to build a web application that allows you to create, read, update, and delete information.
Introduction
The web application would give information about the price and the category of the products available. A user would also be able to add new products to the list of products. The basic knowledge of JavaScript is required from you in order to build the application with me. In addition, I would be using MongoDB for our database in this application. Thus, you need to install MongoDB on your system.
Let's get started with the web application
Create a working directory and a Package.Json file
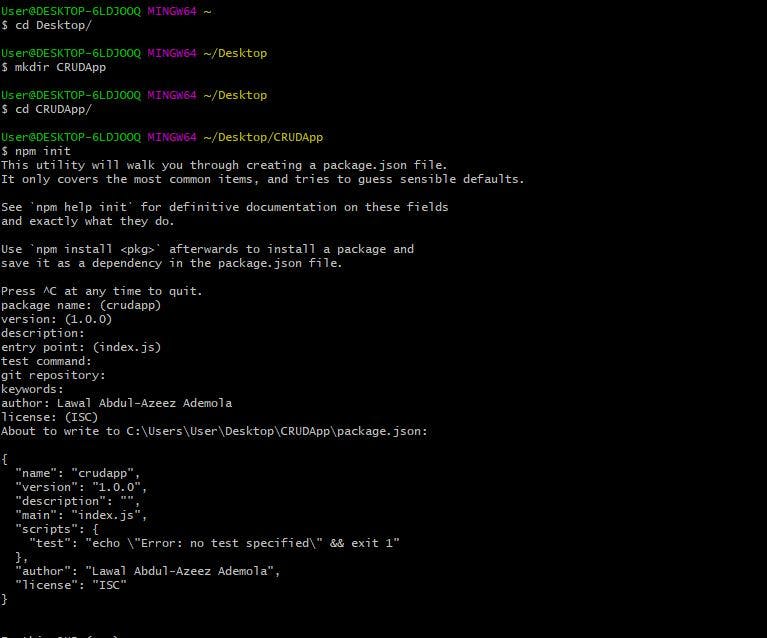
To create directory - CRUDApp, open the terminal and run mkdir CRUDApp. Then, use **CRUDApp** withcd CRUDApp. Create **package.json** withnpm init`. You can also add your name as the author in package.json. The image below describes what you would have in the terminal:
Install Express and create a JS file
Express is a framework written in JavaScript and hosted within the Node.js runtime environment. The framework would be used in this tutorial for requests with different HTTP verbs at different URL paths. To install Express, run npm install express --save in the terminal, and create an entry point with touch index.js.
To use the package, in index.js, require Express and use a port you want the app to listen.
const express = require('express')
const app = express()
const port = 3000

app.listen(port, () => {
  console.log(`Example app listening on port ${port}`)
})
Install Mongoose
Install Mongoose by running npm install mongoose --save in the terminal. In index.js, require Mongoose and connect to MongoDB. For this tutorial, I will create a database with name Crudy.
const mongoose = require('mongoose');
mongoose.connect('mongodb://localhost:27017/Crudy')
    .then(()=>{
        console.log('connected to Crudy')
    })
    .catch(err =>{
        console.log('Error occurred')
    })
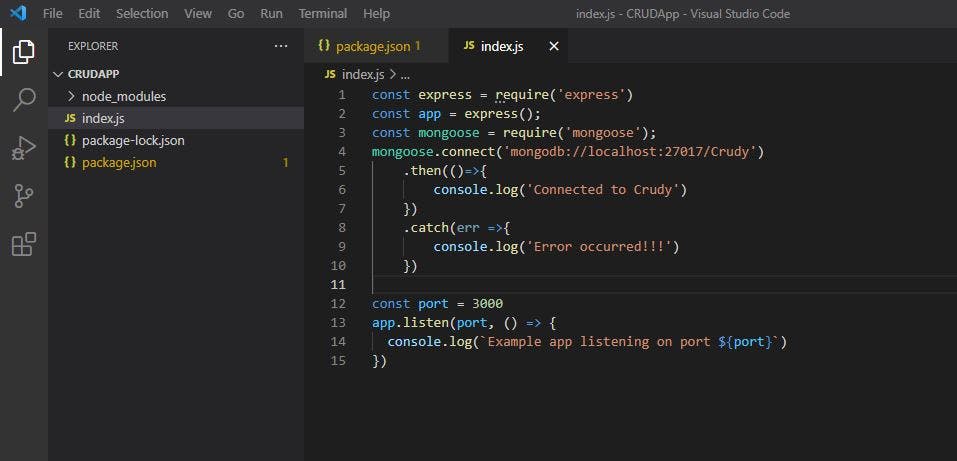
Below is an image of the codes I have written in index.js thus far. This image would guide you as develop your app with me.
Start the server with node index.js in the terminal. Once we connect to the server, Example app listening on port 3000 is printed in the terminal. Furthermore, the app is connected to the database when Connected to Crudy' is printed in the terminal

Install Ejs and create a views directory
Install Ejs with npm install ejs --save in the terminal. Set view engine to Ejs in index.js. Then create a views directory in CRUDApp `.
// in index.js
app.set ('view engine', 'ejs')
Create a Schema for our model
Make a directory - model. In the directory, create product.js. In product.js, build a model that would be used to develop the web application. In order to do this, require Mongoose and create a Schema - productSchema. ProductSchema contains information on features of products (name, price and Category ). After creating the Schema, create a model-Product and export the model. The model would be used in Index.js
// In product.js:
const mongoose = require('mongoose');
const productSchema = new mongoose.Schema({
    name:{
        type:String,
        required:true
    },
    price:{
        type:Number,
        required:true,
        min:0
    },
    category:{
        type:String,
        enum:['fruit', 'vegetable', 'dairy'],
        lowercase:true,
        required: true
    }
});
const Product = mongoose.model('Product', productSchema);
//Export the model
module.exports=Product
In index.js, require the model (Product) and create an instance with the model. The next step is to save the product instance in the database-Crudy.
const Product= require('./models/product.js');

// Creating an instance with Product:
const p= new Product({
    name:'Apple',
    price: 2.35,
    category: 'fruit'
})
//  Saving the instance in Crudy:
p.save().then(()=>{
    console.log(p)
})
.catch(err=>{
    console.log(err)
})
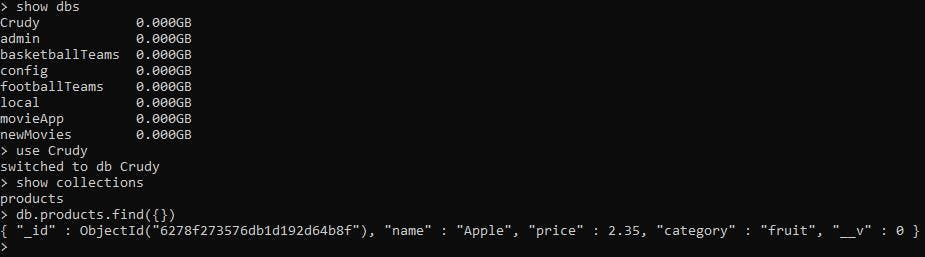
To confirm the instance in the database, start MongoDB, check if there is a database - Crudy with show dbs. The next step is to switch to the database with use Crudy. In the database, there is a collection -products, which you should use to find an instance.
db.products.find({})
The image below shows the instance in Crudy. The data is given a unique id (_id) which we easily use to identify the data.
The next step is to populate Crudy with a list of products. The sample products will reflect on the website we are trying to build. Comment p since it is already in the database, there is no need to keep it in index.js. Below is the list of products (demoProducts) to be added to Crudy:
// const p= new Product({
//     name:'Apple',
//     price: 2.35,
//     category: 'fruit'
// })

// p.save().then(()=>{
//     console.log(p)
// })
// .catch(err=>{
//     console.log(err)
// })

const demoProducts=[
    {
        name:'Golden Morn',
        price:12.00,
        category:'dairy'
    },
    {
        name:'Banana',
        price:5.00,
        category:'fruit'
    },
    {
        name:'Carrot',
        price:2.00,
        category:'vegetable'
    },
    {
        name:'Maize',
        price:4.00,
        category:'dairy'
    },
    {
        name:'Potato',
        price:7.00,
        category:'vegetable'
    },
    {
        name:'Cashew',
        price:2.00,
        category:'fruit'
    },
]
To add the sample products to Crudy, use method- insertMany().
Product.insertMany(demoProducts).then(res=>{
    console.log(res)
}).catch(err => {
    console.log(err)
})
Restart the server in the terminal. console.log(res) prints in the terminal the sample products that have been saved in Crudy
Create a route that shows the sample products A route with a get request will output the products in Crudy. In the route, use Proudct.find({}) to query the database for the products needed. This method takes time to return data (promise-like data), so ensure the query completes before executing the remaining part of the code by using async and await. The next step is to send a response that renders a template using products.
// a route that shows the list of products
app.get('/product', async (req,res)=>{
    const products = await Product.find({});
    res.render('product', {products})
})
Create product.ejs in views directory. When a successful get request to route /product is made, this template would be rendered showing the list of the products with the products data passed into the template.
<!DOCTYPE html>
<html lang="en">
<head>
    <meta charset="UTF-8">
    <meta http-equiv="X-UA-Compatible" content="IE=edge">
    <meta name="viewport" content="width=device-width, initial-scale=1.0">
    <title>Document</title>
</head>
<body>
     <h1>List of Products</h1>
    <% products.forEach(function(product){ %>
        <li><a href=""><%= product.name %></a></li>
    <%}) %>
</body>
</html>
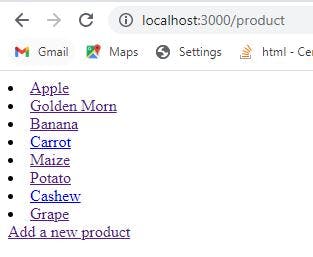
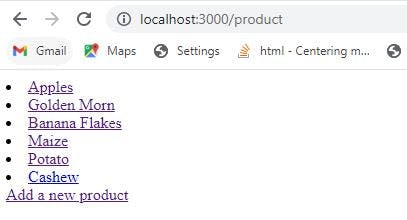
Restart the server with node index.js. If your current directory is views, ensure you change directory to CRUDApp and start the server. Open a browser e.g. Chrome and visit localhost:3000/product. This sends a get request to '/product' and renders the product template.
To check the features of each product, make use of the unique id (_id). To do this, create a route with parameter (id)
// route that shows the features of a product
app.get('/product/:id', async(req, res)=>{
    const {id} = req.params;
    const product = await Product.findById(id);
    res.render('show', {product})
})
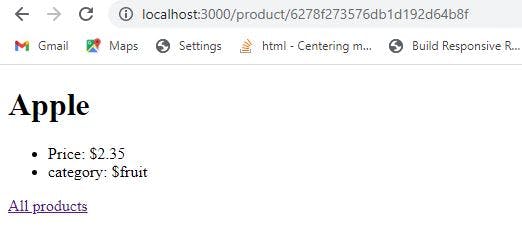
Product.findById(id) in the route, is a method that queries Crudy to find id that matches with (_id). Once a match is found, the data is stored in product, and the product is passed into a show template.
For the Show template to be rendered, create show.ejs in views. The template below will be rendered when a get request is made
<!DOCTYPE html>
<html lang="en">
<head>
    <meta charset="UTF-8">
    <meta http-equiv="X-UA-Compatible" content="IE=edge">
    <meta name="viewport" content="width=device-width, initial-scale=1.0">
    <title>product.name</title>
</head>
<body>
    <h1><%= product.name %></h1>
    <ul>
        <li>Price: $<%= product.price %></li>
        <li>Category: <%=product.category %></li>
    </ul>
    <a href="/product"> All products</a>
</body>
</html>
Add an id product link in product.ejs There is a need to add a unique id (_id) to the link of product in product.ejs, so when a link is clicked, it would render a template showing the features of the product based on the _id.
<% products.forEach(function(product){ %>
        <li><a href="/product/<%= product._id %>"><%= product.name %></a></li>
<%}) %>
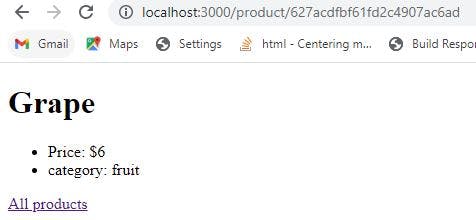
Restart the server and visit localhost:3000/product Click on a product e.g. Apple. A template showing the features is rendered
Adding new product to the product list.
I implemented the ability to add new product to the list of products. In product.ejs, add an anchor tag that renders a form template when clicked.
// In product.ejs
<a href="/product/form">Add a new product</a>
A form template allows you to add features of a new product and submit. In index.js, add a route that renders a form template:
app.get('/product/form', (req,res)=>{
    res.render('form')
})
The next step is to create form.ejs in views. This template would be rendered when a user wants to add a new product to the list of products. In form.ejs, there are inputs for name of the new product, price, and options to select a category.
<!DOCTYPE html>
<html lang="en">
<head>
    <meta charset="UTF-8">
    <meta http-equiv="X-UA-Compatible" content="IE=edge">
    <meta name="viewport" content="width=device-width, initial-scale=1.0">
    <title>Form</title>
</head>
<body>
    <h1>New Product</h1>
    <form action="/product" method="post">
        <label for="name">Name</label>
        <input type="text" id="name" name="name" placeholder="Product name" >
        <label for="price">Price</label>
        <input type="number" id="price" name="price" placeholder="Price" >
        <label for="Category">Category</label>
        <select name="category" id="category">
            <option value="fruit">Fruit</option>
            <option value="vegetable">Vegetable</option>
            <option value="dairy">Dairy</option>
        </select>
        <button>Submit</button>
    </form>
</body>
</html>
The data are stored in the name field of the inputs, and the data can be accessed in the body of the post request route ('/product' ) by using a middleware in index.js.
app.use(express.urlencoded({extended:true}))
In the post request route ('/product'), extract the data from the body of the request (req) and create an instance (newProduct) by using the Product model we created. The next step is to save the newProduct in Crudy and redirect to the new product template
app.post('/product', async (req,res)=>{
    const newProduct= new Product(req.body);
    await newProduct.save();
    res.redirect(`/product/${newProduct._id}`)
})
The next step is to restart the server and visit the list of products web page. Click on Add a new product link, and fill the inputs and select a category.
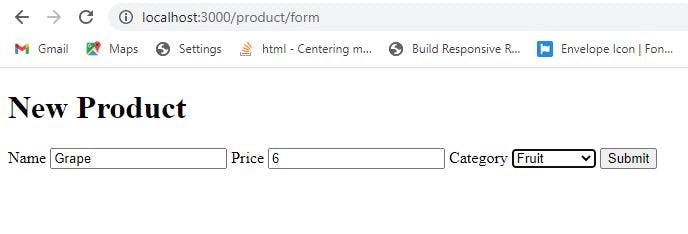
A new product has been added to the product list
Updating a product in the list of produts I implemented the ability to update a product in the list of products using five steps.
Step one: In the show template, add an anchor tag that renders an editForm template when a user wants to edit the product.
<a href="/product/edit/<%=product._id %>">Edit Product</a>
Step two:
Install an Express package (method-override) to use HTTP verbs such as PUT and DELETE. In index.js, require and use the package
const methodOverride=require('method-override');
app.use(methodOverride('_method'))
Step three:
Create an edit form route that renders a form (editForm)template that a user can use to update the features a product.
app.get('/product/edit/:id', async(req, res)=>{
    const {id} =req.params;
    const product= await Product.findById(id);
    res.render('editForm', {product})
})
Step four:
The next step is to create a route the updated form data in editForm template would be submitted to. The route should contain the id of the product to be updated. Then, method Product.findByIdAndUpdate() to search Crudy for the id that matches the _id and update the instance with (req.body). The route should redirect to the updated product.
app.put('/product/update/:id', async(req,res)=>{
    const {id} =req.params;
    const product=await Product.findByIdAndUpdate(id, req.body, {runValidators:true});
    res.redirect(`/product/${product._id}`)
})
Step five:
In editForm, I populated the form inputs with the data passed (product). The data was passed in form inputs by setting the value field of the inputs to the data. Also, include the route the updated data would be submitted to. The route should have ?_method=PUT in order to override the default method="post".
<!DOCTYPE html>
<html lang="en">
<head>
    <meta charset="UTF-8">
    <meta http-equiv="X-UA-Compatible" content="IE=edge">
    <meta name="viewport" content="width=device-width, initial-scale=1.0">
    <title>Edit Form</title>
</head>
<body>
    <!DOCTYPE html>
<html lang="en">
<head>
    <meta charset="UTF-8">
    <meta http-equiv="X-UA-Compatible" content="IE=edge">
    <meta name="viewport" content="width=device-width, initial-scale=1.0">
    <title> Edit Form</title>
</head>
<body>
    <h1>Edit a Product</h1>
    <form action="/product/update/<%=product._id%>?_method=PUT" method="post">
        <label for="name">Name</label>
        <input type="text" id="name" name="name" placeholder="Product name" value="<%=product.name%>">
        <label for="price">Price</label>
        <input type="number" id="price" name="price" placeholder="Price" value="<%=product.price%>" >
        <label for="Category">Category</label>
        <select name="category" id="category" value="<%=product.category%>">
            <option value="fruit">Fruit</option>
            <option value="vegetable">Vegetable</option>
            <option value="dairy">Dairy</option>
        </select>
        <button>Update</button>
    </form>
</body>
</html>
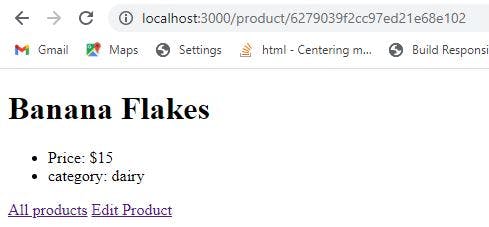
Restart the server and visit localhost:3000/product. Click on a product to update e.g. Banana, editForm template is rendered with the features of the product. Update the name to Banana Flakes, price to $15.00, and the category to dairy.
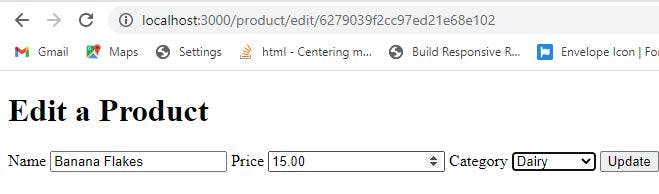
After clicking on update button, the image below shows the product was successfully updated with new features.
Deleting a product from the list of products
This is similar to updating a product as the use of method-overrride comes into play. In show template, create a form with a delete button a user can click to delete the product. The form should have a route with id of the product and also set method-override to delete(?_method=DELETE).
<form action="/product/delete/<%=product._id%>?_method=DELETE" method="post">
        <button>Delete</button>
</form>
Create a route that deletes a product. The route should contain id of the product to be deleted. Then, use method Product.findByIdAndDelete(id) to search Crudy for the id that matches _id in Crudy and delete the product. After deletion, the route should redirect to list of products page.
 app.delete('/product/delete/:id', async (req,res)=>{
    const {id} =req.params;
    const deletedProduct = await Product.findByIdAndDelete(id)
    res.redirect('/product')
})
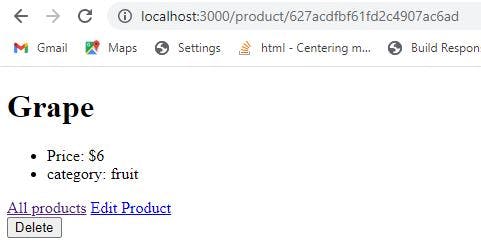
Delete a product e.g. (Grape) from the list of products for trial. Click on Grape, on the page, a delete button should be clicked for deletion of the fruit. The route then redirects to the list of products page.
Conclusion
Building a dynamic web application requires reading of necessary documentations and also having a lot practice. The guide for building a CRUD web application in this article is one of the many ways to get started with Node.js, NPM packages, and database. A great way to put what you have learnt from this article is to build another web application that allows a user to create, read, update and delete items e.g. To-do-list web application. Building the application would improve your knowledge and you could one day use the application to impress your prospective employer.